Post 16 - The Mage Attack
*The contents below are my own opinions and not that of my employer*
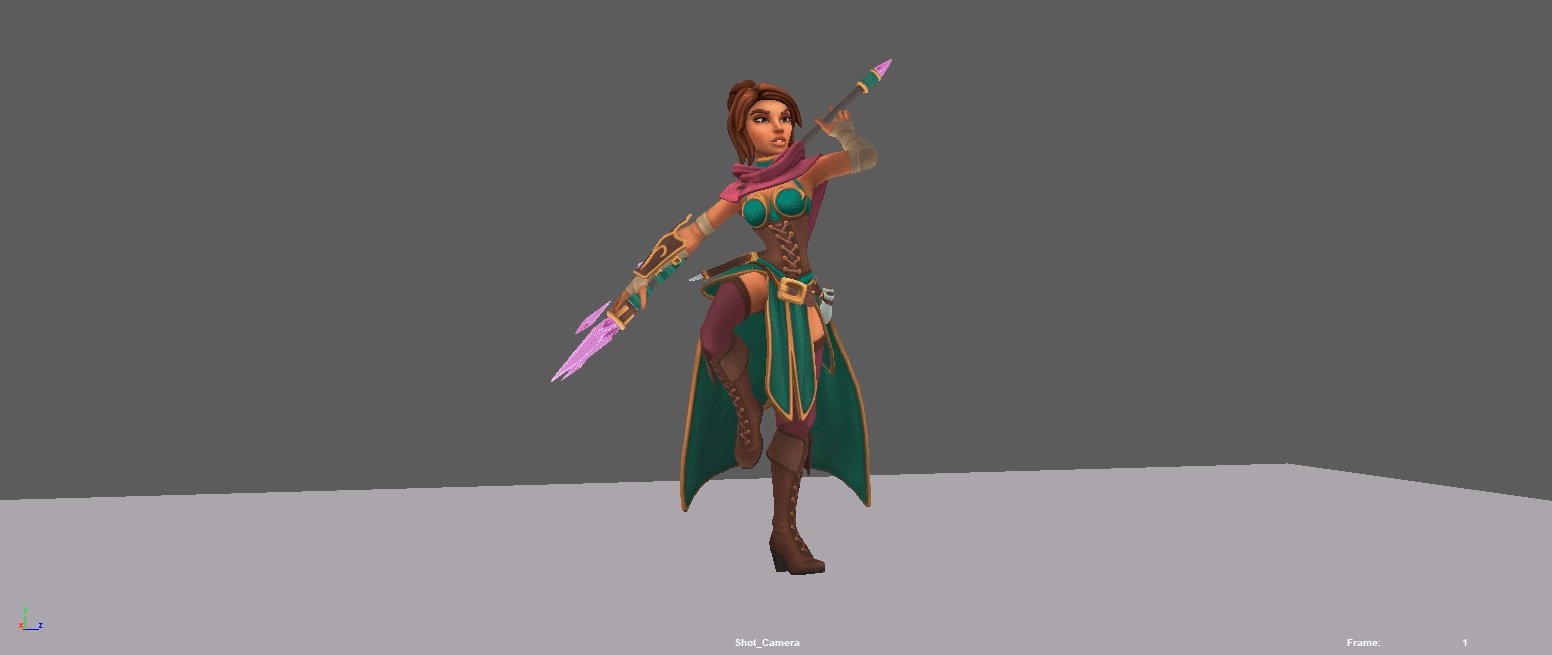
Character Model by: Nikola Milievi
Character Rigging and Environment by: Kiel Figgins
Character Animation by: Kurtis Paddock

The long road ahead
I spent almost an entire year streaming the process on this piece. Keep in mind I didn’t work on this every day over the past year so take that timeline with a grain of salt. Still a lot of hours of animation, care, hate, love, and time on this piece. We learned a lot, we laughed a lot, and we went through a lot of notes. So here it is Folks, a breakdown of the little animation that started out as 60 frames… and quickly ended up 260 frames.
Reference, Blocking, and Rough Timing
When I began this animation my plan was to have her move into her anticipation pose, go into the attack, and end with her knelt down and moving hold after the staff slam down. Easy, simple, and straight to the point. I pictured a 60 to 100 frame physical attack plus spell. EZ PZ.
I didn’t quite know how I was going to sell the magic spell when we started this piece so I began to look for physical acting reference. For whatever reason, my mind first went to the scene from Yimou Zhang’s film “Hero” where Nameless (Jet Li) and Sky (Donnie Yen) clash. I knew I wanted a little bit of flurry and flare in her staff and who better to reference then these Legendary Martial Artists. This camera angle was also very benefical for me to clearly read what Sky’s feet and COG were doing.
Below I’ve cut out the piece of staff inspiration and reference I focused on. You can watch the entire fight choreography here which is amazing and I highly recommend the film.

The staff control and body movement that Donnie Yen displays in this sequence are jaw dropping. I really liked this bit right here where he brings the staff across his body, then back, then his whips it around while turning his body for this downward slice attack. It’s cool to see the body wind up and see where the power/momentum of the staff is being led from. I knew I wanted to get practice in on just spinning a character’s body and spinning props/objects. So this bit of reference was great inspiration for that.
I began with the simple idea of the Mage striking an anticipation pose and spin into her final attack position. Keeping in mind my Donnie Yen reference as a major style guide for this action. The spin was a must and strong action posing was paramount. So starting in stepped mode, I began to sculpt in my key poses. Having my reference continually play on my other monitor keeps me aligned to my first creative thoughts about the piece.

This was the very first block out of, what I thought at the time, was going to be the complete idea for this animation. We spent quite awhile on this version of the attack. I was really focusing on the spin and staff slam down to be the main story pieces of this animation puzzle. The more we looked at this the more we realized we needed to push the last pose more and started adding breakdowns to get a better read on the spin.
Still staying with the timing idea that her slam would be the quickest part. I knew I wanted to hold that last pose to show the energy she had used to make this magical staff work. But as we played around on that pose and held her in that knelt down, I knew I needed to add something more to this. This is where the stand up idea was born.
Below you’ll see our first draft of putting in our key stand up poses and rough timing.

Timing, Over Blocking, and Dream Killing
The hold after the slam, followed with the slowed stand up, began to make me feel better about this piece. At first, the slam was cool but it was just a generic slam. Nothing unique and nothing really too appealing I felt. Adding this stand allowed me time to show some character. Here is what I wanted to hit in my character beats:
- Distinct Timing: I wanted the attack timing deliberate/quick and the recovery timing methodical/slow for contrasting timing and spacing. Opposite timing like this adds life like texture and appeal to your animation.
- Fierce while Attacking; Vulnerable in Recovery: Showing an aggressiveness in my posing up front with the spin and slam. Then displaying the human vulnerability of this Mage as she recovers from her spell. This gives me 2 story beats for my animation.
Below is one of the first play blasts where I felt these character moments were starting to come together.

To add these character notes I would need to start creating more poses and break downs. This is what I call my “Over Blocking” phase. Here I’m adding as many breakdowns as possible to help better sell the idea and weight. The more keys the better especially if you’re still in Stepped Mode.
I’ve also started playing around with some “FX” in the above version. After my block out and playing with the slam pose, I knew I wanted to make an Arcane Explosion type of effect if I could. I drew a lot of inspiration from Animators I fellow on various social medias and I had been seeing a lot of cool, cheap, and super simple play blast FX solutions. So after careful planning and research, I went with a complex pink sphere that I animate the opacity out on.
Below you’ll see our final blocking render. You’ll notice a lot more poses and details have been added to this version compared to the previous render.

Now that our blocking is considered “final” I will start adding overlap into my stepped keys so that when I hit that “Dream Killer” of a Spline button, we’ve got overlap already built in. What ever you can add into your stepped mode blocking, the better. In fact, more key frames in stepped mode the better if you want to avoid the coming madness ahead in this blog.
Oh… What’s the “Dream Killer” you ask? “Coming madness” you say?
This madness I’ve deemed “The Dream Killer” is when you have, what you think, are your final stepped mode blocking and timing completed. You select ALL your keys and change it from ‘stepped keys’ mode into ‘spline keys’ mode.
Then you hit the play button and watch all your animation dreams get killed as you’ll see below:
It’s a thing of beauty isn’t it? To go from a wonderfully timed stepped mode play blast to this loony mess. Like I said, THE best way to defeat these kinds of dream killing issues is to make sure you have plenty of keys set. And “bookends” where you want your holds. Being able to plan out your holds are crucial when working in stepped mode.
For example: I should have put a bookend right after she slams the staff down to keep her spine from rotating back and forth. Since there aren’t any bookends there, she rotates back and forth where the computer is trying to figure out the mathematics behind the key I have set there.
Get Comfy, Its going to be awhile
We’ve now made it to the last 10% of your animation. What should be a quick wrap up instead now begins, what I feel, takes up the biggest chunk of the Animator’s time: Spline Polish.
This is where we start combing through every axis on every single rig control we have available to us on your character rig. No solider left behind in this phase! This is where you really turn on those Director Eyes and dig into the details of your animation. In order for me to focus better on this task, I like to break my animation down into bite sized pieces when I start the spline details.
In this example, I took my timeline and shrunk it down to just the first 40 frames. Focused my refining those frames first before I move onto the next 40.

Again, my polish still starts at the Center of Gravity as I work my way out. You can see I’m also starting to get a feel for how her “extras” are going to play into the animation. Like her hair, cape, clothing, and potion bottle accessories. Though not necessary this early in the spline polish phase, I’ll do this on my first chunk of frames just to see how it all feels completely put together. Gives me more motivation to finish this part of the work.
In this next preview I’m starting to work my way to the spin.

This is where I realize (by getting feedback from multiple sources) that I’m going to have a problem with the spin and the way I have her holding the staff. Her arms would cris-cross and cause me headaches trying to adjust down the timeline. After some spinning around in my room with a metal bar, I decided to go with her spinning the staff above her head as seen below.

It is here where I decide to change the ending completely. After watching this back for the thousandth time I feel like she needs to display more “tiredness” when standing back up. I mean…she just used this massive amount energy in this single blast. Let’s show even MORE vulnerability in the character.
Below is the where you’ll see our new stand up ending:

I felt this was a much better story beat for the end of our attack. By climbing up her staff I’m attempting to show the audience that she’s used up so much energy conjuring that blast that she needs a little assistance getting back into a ready position. It also gives us a nice timing beat to let the animation breathe and allow the cloth work (and billion other offsets) a moment to shine.
We also played with the ending on this version. Having her pull the staff from it being embedded into the ground due to the slam. I thought it gave it a nice moment and a better purpose for her end pose. Plus it shows the audience how damn hard she slammed that staff.
I’m also taking this moment to figure out how I want her cloth and bits to settle after the explosion. To me, this was a moment to really sell what kind of material her cloaks and capes were made out of. In the end, I went for a lighter wool cape with a light cloth cloak.
Environment, Camera, Playblast
Now I feel like I’m ready to start working on a camera to help the animation shine at this point. Either that or I was tired of looking at the attack and needed something fresh to focus on. Which is never a bad thing. As Animators, we tend to look at the same action thousands of times. Easy to burn out on something like that so switching focus on something else and then coming back to your main action is helpful I’ve found.
I ended up using an environment from the Kiel Figgins Store. This castle courtyard environment was a perfect fit for our Mage. You can see how everything is broken up individually which allows you to duplicate and play with the set to make it your own. Since it was built that way I started playing around by duplicating pieces of the set and moving them to different areas. This is all in hopes to make it feel more “lived” in when I go to start playing with my camera.
Below is a picture of the original version of the environment.

Originally I wanted to make this more of a “Play of the Game” type of cinematic camera. With that idea I needed to make her environment surround enable to spin the camera, etc. So I began mocking up some ideas on how that would feel and look like. Camera tests don’t need to be beautiful. You’re just trying to find how your camera can better suit your animation.
Below you’ll see some of my camera tests for this Play of the Game animation test:
Camera_POG_Test_Version_02 below:
I definitely liked the feel of this camera much more than the first camera test I did. The problem for me was there were more body mechanics adjustments I would need to address so I could make this read better from the “straight on” camera angle. And with the amount of time I had already spent on this piece, I was honestly ready to sign off on it and move onto the next animation. It was time to wrap it up.
That’s a wrap
In the final version (seen at the top of this blog and at the bottom of this paragraph) I choose something similar to this but I shifted the camera to around her left side in hopes to give her more depth in the shot. I felt that straight forward camera angle flattened the image out and loose a lot of depth within the frame. I also decided to drop the quick camera zoom out during the arcane explosion. I felt it took away from the animation (and the work we did) with this abrupt camera move. Instead I added a very slow push in to keep her framed throughout the piece. I have to admit it, with the time I’ve spent creating this breakdown I’ve come up with a new camera idea to better showcase this piece on my reel. Stay tuned!
I hope this breakdown is beneficial to your process in some why. Be it a new idea or approach to an animation you’re working on. Or just learning something about how animation is done in general. If you’ve made it this far in the blog, thank you very much for taking the time to read this entire insight into my process for this particular piece.
Animation is hard. Writing about Animation is harder.